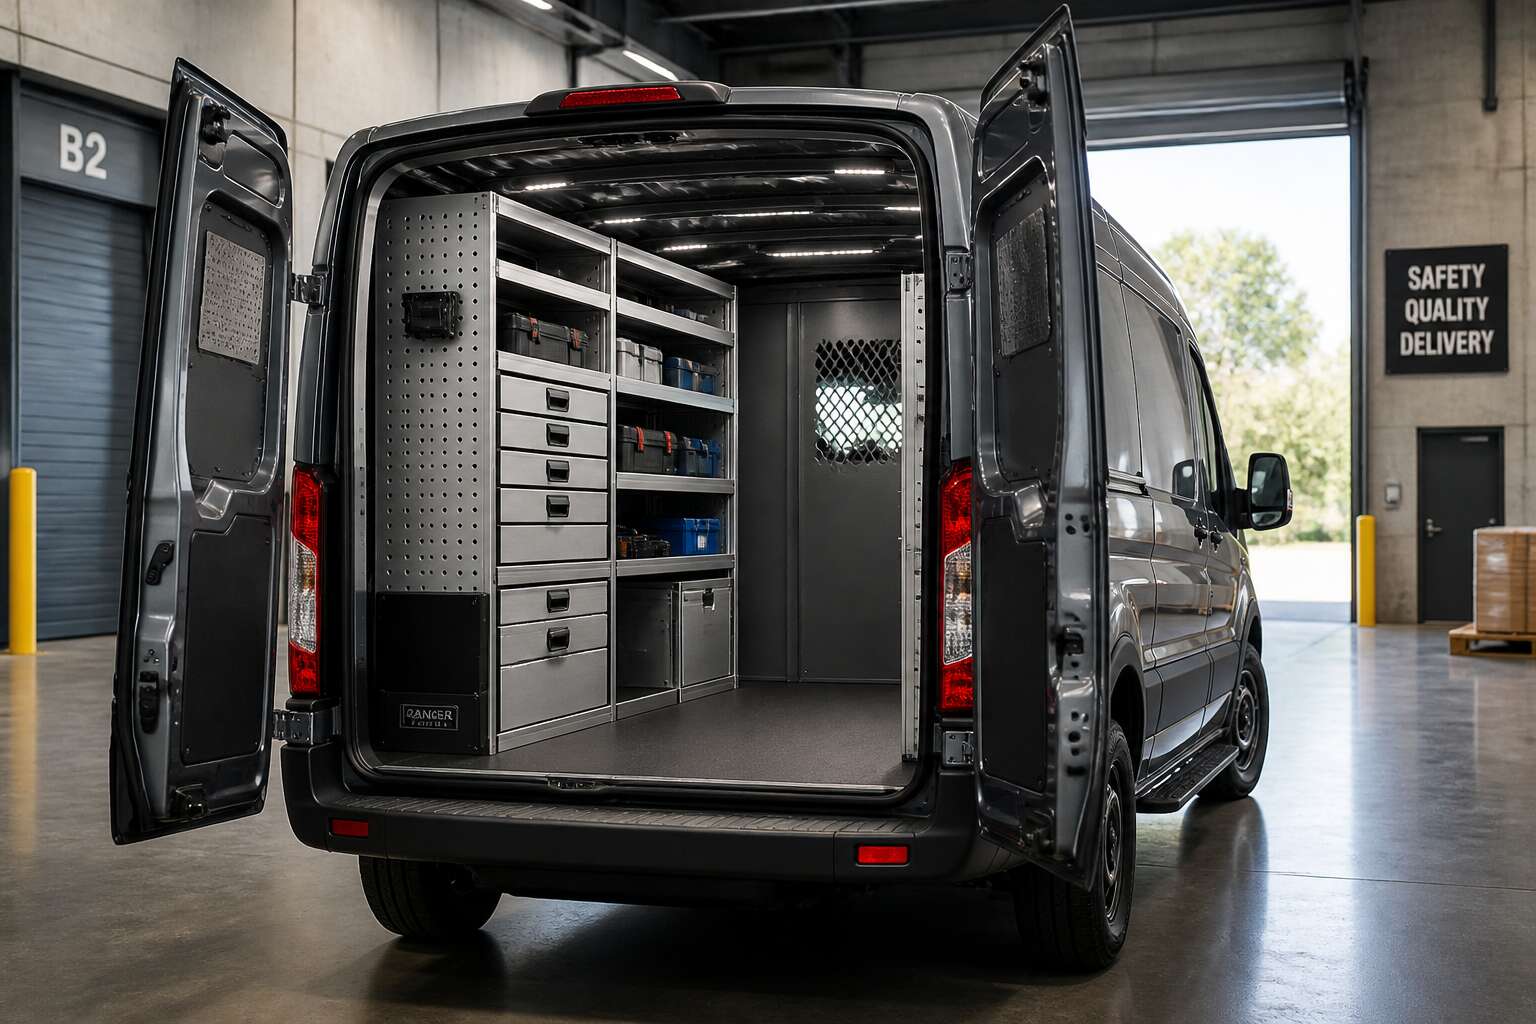
Key Benefits of a Professional Vehicle Storage System
Improving Job-Site Efficiency and Accessibility
The average tradesperson loses 2.5 hours each week to a chaotic cargo area. A professional vehicle storage system converts that lost time into billable hours. With a van racking transporter, every tool gets a permanent place. No more rummaging through tangled cords or balancing a drill on a wheel arch.
The true benefit is accessibility. When your gear is secured and sorted, you retrieve items in seconds. This lowers fatigue and protects expensive equipment. Think about your daily routine:
- Less setup time at arrival
- Fewer missing sockets or bits
- Quicker departures after each job
A structured interior enhances safety. Nothing slides into the back of your head during a sharp turn. The system works for you, allowing more minutes for actual craftsmanship and fewer for wrestling with your own vehicle.
Protecting Tools and Equipment from Damage
A hammer tossed into a steel tray costs more than a dented edge; it costs a reputation staked on precision. Tools endure brutal commutes along Johannesburg roads, where potholes and panic stops conspire against calibration. A professional vehicle storage system cradles each instrument in its designated foam or reinforced slot, absorbing shock that would otherwise travel through a loose toolbox. Moisture and grit find no purchase when sealed compartments protect sensitive electronics. The quiet tragedy of a tradesperson’s trade is watching a micrometer drift out of true after a week of careless transit.
A van racking transporter changes that relationship. You trust your equipment to survive the journey, not just the job. That trust becomes a form of wealth.
– Prevents impact fractures on torque tools and levels
– Shielding laser levels from dust and condensation
– Extending battery lifespan through climate controlled cradles
When every driver becomes a steward of their own inventory, the machinery rewards them with years of loyal service. The racking system turns a chaotic steel box into a sanctuary for the instruments of your livelihood. That is the quiet glory of an organised interior: your gear stays honed, ready, and honest, no matter the terrain outside.
Enhancing Safety by Securing Loose Items
A van racking transporter changes the physics of a hard brake. Loose items in an uncontrolled cargo bay become projectiles. On the N1 or a gravel road near Nelspruit, an unsecured tool box can slam into the cab with force enough to injure. Professional vehicle storage systems keep every item in its place.
Consider what a professional system secures:
- Battery packs that could shear through a tie-down
- Pipe wrenches that slide forward during a panic stop
- Chemical containers that could rupture and spill
Safety extends beyond the driver. Pedestrians and other motorists face less risk when nothing shifts mid-corner or tumbles out of the rear door. A van racking transporter with locking drawers means fewer emergency stops, because you are not waiting for something heavy to slide.
I drove an unracked van with a loose drill press. The bang when it shifted nearly put me in the next lane!
Boosting Vehicle Resale Value with Custom Fitments
A van racking transporter alters the financial value of vehicle ownership. Custom fitments preserve the interior’s original contours, preventing damage from ad hoc drilling. When you sell, buyers recognize this craftsmanship.
They pay more for vehicles that show careful maintenance. Consider what a tailored system shields:
- floor panels from heavy footfall
- door trims from repeated loading
- factory seals against dust and moisture
The resale value climbs by thousands. This is market logic, not speculation. A van with pristine mount points indicates attentive ownership. This storage system becomes an asset that outlives current projects.
Exploring Different Shelving and Drawer Configurations
Fixed vs. Adjustable Shelving Units
Shelving configurations quietly shape every job you complete. I have seen technicians lose precious minutes because their drawers were either too shallow or too deep.
Fixed shelving units deliver predictable strength for heavy, uniform loads. Adjustable units let you reposition shelves as your cargo changes. Neither option wins outright; your typical work pattern determines the better fit.
- Fixed shelves: hold up under repeated weight
- Adjustable shelves: accommodate odd sized equipment
Drawer depth deserves equal attention. A shallow tray organises fasteners, while a deep drawer secures bulky tools. Testing your actual load before finalising a van racking transporter setup prevents expensive modifications later.
Modular Drawer Systems for Small Parts
Modular drawer systems turn a chaotic pile of small parts into a quiet, organised inventory. In a van racking transporter, these drawers give every fastener and fitting a fixed home. A technician can pull a drawer, find the exact clip or screw, and close it without searching through bins stacked in the dark. I have watched this simple change shorten repair stops by minutes.
- Full-extension drawers for easy access to the back row
- Divided trays to separate sizes without extra containers
- Lockable modules for valuable consumables
- Foam inserts that cradle delicate components
The beauty of this approach is how it changes your workflow. You stop digging and start working! For a van racking transporter used across long distances, that small drawer saves the kind of time you never get back.
Heavy-Duty Tray and Bin Solutions
A colleague once told me he spends more time moving trays than turning spanners. He was right. In a van racking transporter, the configuration of heavy-duty trays and bins determines how quickly you can reach a component and get back to work.
Heavy-duty trays handle the parts that drawers cannot. A forged bracket, a brake disc, a clutch assembly. These need a flat, stable platform that slides out and takes the weight. Bins keep consumables and fasteners separated by size without forcing you to dig through a drawer.
The configurations worth exploring include:
- Full-width trays that support long components
- Stacked bin racks for small loose parts
- Tilted tray shelves that bring rear items forward
- Removable tray carriers for worksite delivery
Separating these by weight and frequency keeps your van racking transporter organised. You load the heavy, frequent items at waist height and the rare, bulky parts lower down.
Ladder and Pipe Racks for Long Loads
A van racking transporter that cannot carry a six metre ladder is a van racking transporter only in name. I once watched a contractor tie a ladder to his roof rack with rope and regret every pothole. Long loads need dedicated racks.
Ladder and pipe racks sit along the roofline or on the side walls. They hold aluminium ladders, conduit, and timber. The best designs use vertical dividers with rubber grips. They keep loads off the floor, freeing space for toolboxes.
- Roofline racks for ladders over three metres
- Side-mounted racks for pipes and rods
- Adjustable cradles for mixed loads
Each option turns an ordinary van into a proper van racking transporter.
Sliding and Roll-Out Racks for Deep Storage
I have watched contractors lose an hour searching for a wrench they swore was on the van. A deep shelf hides more than it holds. A van racking transporter carries a month of supplies, but items buried at the back are out of reach.
Sliding and roll-out racks change this. Full-extension runners bring the load to you. The contents glide forward, and what was lost is found again.
Consider these configurations:
- Roll-out trays rated for 100 kilograms
- Shelves that lock when extended
- Drawers with soft-close slides
Each configuration turns the dark recess of a van into a workspace. You stop digging and start working. The rack becomes an extension of the job site, not a storage unit you owe an apology to.
Planning the Ideal Layout for Your Work Vehicle
Measuring the Cargo Area with Precision
Statistically, most van racking transporter mistakes trace back to someone eyeballing a measurement. That number you skip becomes the gap between a shelf and a wheel arch. Start by measuring the cargo area in three dimensions, at floor level, waist height, and ceiling height. Walls bow, floors curve, and the roofline slopes. Capture the narrowest points.
Mark the positions of wheel arches, door pillars, and any protruding brackets. These features reduce usable volume more than you expect. A van racking transporter designed from accurate figures allows for accessible storage and easy movement.
Measurements to record:
– Interior height at front and rear
– Width between wheel arches
– Door aperture width
– Floor-to-sill height
Precise dimensions prevent expensive fabrication errors. Your van racking transporter should fit the vehicle, not fight it.
Mapping Daily Workflows and Frequently Used Items
The average technician opens their cargo area 30 times per shift. Each search costs seconds you cannot recover. Your van racking transporter should follow your daily rhythm, not fight it! Start by mapping every job step from arrival to completion. Note which tools you reach for first and what stays idle all week.
Order your plan around these actions:
- Identify the top ten items used daily
- Group them by job phase
- Assign each group a zone near the door
Stash rarely used gear at floor level or behind active zones. Reserve waist height for heavy power tools. This placement cuts bend and stretch cycles. Once the sequence feels natural, commit it to the layout. Revisit it after two weeks. Adjust based on actual usage, not guesswork.
Balancing Weight Distribution Across Axles
Load the rear axle beyond its rating and the steering goes light. Load the front too heavily and the suspension bottoms out on speed bumps. A van racking transporter must respect the manufacturer’s axle limits. I weigh each zone of the cargo area before committing to a layout. Move the heaviest items forward, between the wheelbase. Place batteries, compressors and generators behind the bulkhead.
- Read the payload rating from the VIN plate.
- Weigh the empty van with racking installed.
- Subtract that from the gross vehicle mass.
The difference gives the actual payload budget. Leftover space does not equal leftover capacity! Keep heavy drawers low and close to the cab. Light shelving can rise to roof level. Check tyre pressure after the layout is fixed because the centre of gravity shifts.
Integrating Lighting and Power Outlets
Consider the state of a South African workday after the sun drops. A van racking transporter without interior lighting becomes a guessing game. I have watched drivers fumble for sockets in a dark cargo hold, and it never ends well. Good lighting changes the experience entirely.
Plan the electrical layout before fitting the units. Decide which zones require what:
- LED strip lights along the roof for general visibility.
- A work light near the rear opening for evening jobs.
- Dedicated outlets for charging batteries and running power tools.
Power outlets need a dedicated fuse box. Place them near the heavy drawers, not at floor level. A reliable inverter keeps the system stable. The entire setup must respect the van’s electrical capacity. The added load also shifts the centre of gravity, so check the payload budget. A well lit work van makes every job less of a chore.
Leaving Clear Sightlines and Rear Visibility
The average driver loses up to 30 percent of rear visibility once racking goes in. That figure changes how I approach every van racking transporter layout. Low-profile units near the rear doors keep the cargo hold visible through the cab. Tall shelving belongs behind the bulkhead, never against the back windows.
The rear-view camera becomes useless if a rack blocks its angle. I check each unit’s height against the camera’s line of sight. A clear corridor down the centre also helps. That corridor lets you confirm the rear doors are shut without stepping out.
Consider these visibility checks:
- Examine the mirror sweep from the driver’s seat.
- Measure the camera’s downward angle.
- Test the rear window sightline with a full load.
A well planned layout treats visibility as a safety feature, not a convenience.
Accommodating Future Tool Additions
Planning the ideal layout for your work vehicle requires thinking beyond today’s toolkit. The best van racking transporter setups leave room for the unexpected. I always advise clients to map out potential additions before locking down a design. A cordless charging station, a compact compressor, or a second battery bank might arrive next year. That means reserving vertical space now rather than retrofitting later.
A flexible layout treats the van as an evolving workspace. The van racking transporter itself provides a base for later modifications. Weight distribution changes as tools accumulate. Access points for power cables need to exist before the racking goes in.
- Will future tools shift the centre of gravity?
- Are there access points for new cables?
- Can shelving heights change without major surgery?
This foresight prevents expensive rework.
Installation Advice and Common Pitfalls to Avoid
Selecting the Right Fixings for Different Panel Types
Selecting the correct fixings for a van racking transporter requires knowing exactly what lies behind each panel. Bare sheet metal, plywood liners, and composite honeycomb all resist fasteners differently. I once watched a rivet nut spin free inside an aluminium chequer plate because someone chose self-tapping screws instead. That repair cost a full day.
Measure the panel thickness with a micrometer and match the fixing to the substrate. Common pitfalls include over-torquing into sandwich panels and skipping the torque specification.
- Do not use the same screw for steel and aluminium
- Fit spreader plates for hollow cavities
- Verify pull-out resistance with a sample test
Every fixing in a van racking transporter carries real weight. A few extra minutes during installation prevent weeks of rattling and loose shelves. Trust the numbers, not the looks.
Understanding Load Ratings for Secure Mounting
Load ratings printed by manufacturers are often ignored in a rushed installation. In South Africa, where road conditions stress every joint and bracket, a van racking transporter that disregards rated capacities will eventually twist, groan, or fail. The base vehicle absorbs every mistake. When you bolt a rack system into a van racking transporter without calculating how the payload distributes across the chassis, you invite premature suspension wear and dangerous handling.
Common pitfalls that undermine secure mounting:
- Selecting bolts by thread pitch instead of shear strength
- Drilling through structural members without consulting the chassis diagram
- Assuming a thicker bracket compensates for a weak fixing point
Each mistake compounds. I have watched a shelf rated for 80 kilograms fail at 40 once vibration and lateral forces enter the equation. The published load rating is the only truthful number in the entire design.
Ensuring Quick Access Without Creating Obstructions
Quick access is a function of deliberate placement, not brute capacity. A van racking transporter can hold every tool you own, yet if a bin sits too deep or a latch faces the wrong way, you lose minutes on every retrieval. I have watched installers mount heavy trays behind a support post, forcing an awkward reach that slows the entire workflow. Plan around your dominant hand and the door opening. Keep frequently used items at waist height, and check that nothing swings into the aisle when a drawer extends.
Common obstructions to eliminate during installation:
- Loads that block the sliding mechanism when stacked unevenly
- Straps or brackets protruding into the walkway
- Shelves that obscure the rear view when the door is open
If you cannot grab an item without bending your knees or shifting your body, the racking design has failed. A van racking transporter should feel like an extension of your reach, not a puzzle to solve at every stop.
Preventing Rattles and Vibrations During Transit
Rattles are not a minor annoyance. They are the sound of a system working against itself. I have seen a van racking transporter fail not because the bolts were loose, but because the installer ignored how vibration travels through the frame. Every joint, every drawer slide, every bin edge carries that energy.
The fix starts with the fixings. Rubber isolators between the racking and the van’s metal panels absorb the chatter that turns a work van into a drum. Use threadlocker on any bolt that faces constant movement. Check load distribution after the first week. A van racking transporter will settle, and the settling reveals new gaps.
- Inspect all fasteners at 100 km and again at 500 km
- Apply foam tape to bin edges that rest against vertical supports
- Leave a small gap between sliding trays and their end stops
Do not overtighten the tension straps. Overtightening creates stress points that hum at speed. If a drawer rattles at idle, the problem is rarely the drawer. It is the alignment of its runners. Fix the alignment, and the noise disappears.
Using Corner and Floor Mounts for Additional Stability
Most installers ignore the floor’s load-bearing capacity. A van racking transporter relies on corner and floor mounts to transfer weight directly to the chassis. Without these, the entire structure teeters on thin wall panels. I have watched racks fail because someone trusted only the upper boltholes. The floor is your strongest ally!
The common pitfall is overusing adhesive instead of mechanical fixings. Adhesive cannot handle torsional stress. Another mistake is placing mounts on uneven surfaces without shims. This leaves gaps that flex during transit. A van racking transporter needs at least four floor mounts per bay.
- Always use steel brackets on both corners and floor.
- Torque each bolt to the manufacturer’s specification.
Rigidity comes from triangulation. Count your mounts. Then count them again after the first loading.
Maintenance, Upgrades, and Long-Term Care
Routine Cleaning and Rust Prevention
Maintaining a van racking transporter demands more than a quick rinse. Corrosion starts where scratches expose bare metal. After every major job, wash the racking with mild soap and water, then dry it thoroughly. Inspect the powder coating for chips, particularly around sliding components. Touch up any damage with cold galvanising paint to stop rust from spreading.
Fasteners need equal attention. I torque every bolt on my system every few months. Vibration from daily routes loosens fittings gradually. A simple checklist keeps you organised:
- Inspect all mounting points for movement
- Clean and lubricate drawer slides
- Seal any exposed drill holes
Upgrades such as replacing mild steel bolts with stainless hardware make sense when you notice corrosion. A disciplined maintenance routine extends the life of your van racking transporter and keeps it dependable for years.
Replacing Worn Latches, Hinges, and Tracks
Latches, hinges, and tracks wear out long before the rest of the van racking transporter. I have seen a drawer track fail after three years of daily use, leaving a heavy toolbox stranded halfway out. The fix is straightforward: replace the component before it breaks completely.
Check each latch for play. A hinge that creaks and binds needs replacement, not another squirt of oil. Tracks collect dust and grit, accelerating wear on rollers. Order spare parts from the manufacturer to guarantee a proper fit. Aftermarket components sometimes work, but they often require modification.
- Test every latch and hinge at the start of each month
- Replace worn tracks in pairs to maintain alignment
- Keep spare latches and hinges in a labelled bin
Neglecting these small parts turns a minor repair into a major headache. A broken latch on a loaded van racking transporter can spill tools across the road. Replace worn components early and the system stays dependable.
Repositioning Shelves as Inventory Needs Change
Inventory changes. The spare alternator you swore you needed now rusts in a corner, while your drill bits have expanded into three messy boxes. When that happens, fixed shelves in a van racking transporter make every job awkward. Adjustable shelving lets you shift levels, but only if you actually take the time to do it.
Start by emptying the racks completely. Measure the height of every new item. Slide the shelves to match the new stack. One practice keeps this simple:
- Use a marker to note contents on each shelf edge
- Keep the same bolts and brackets to avoid drilling fresh holes
- Recheck the load rating after each repositioning
This routine takes an hour and prevents a lot of grumbling later.
Adding Security Features Like Locks or Alarms
Theft is not a hypothetical. It is a recurring character in the story of every tradesperson who owns a van racking transporter. Adding locks or alarms is less about hardware and more about acknowledging the vulnerability of a mobile workspace.
A simple deadbolt on the rear door transforms a moment of doubt. An alarm system with tilt sensors catches the stubborn criminal who believes cargo is fair game. The psychological relief is immediate. You sleep better knowing the van racking transporter has its own voice.
Consider what needs protection:
- High-value tools stored in accessible drawers
- Loose equipment that invites opportunistic theft
- The quiet confidence of a secured load
When to Consider a Full System Refresh or Replacement
The lifespan of a van racking transporter is measured in kilometres, not years. Coastal air in South Africa accelerates galvanic corrosion between dissimilar metals. I inspect my own system for delamination of the composite boards and micro-cracks around the bolt holes. These are quiet failures.
Upgrades matter. Replacing steel shelves with lightweight polymer slashes gross vehicle weight. That frees payload for actual work!
To decide on a full refresh, consider the following:
- Joints are welded or riveted beyond practical repair.
- The racking no longer fits the current vehicle model’s load rating.
- Repair quotes exceed 40% of a new installation’s cost.
Once the chassis of the vehicle changes shape, the van racking transporter becomes a liability rather than an asset. Retirement is a maintenance decision, too.



0 Comments